MegaSquirtPNP MM9093 ManualRevision N, 1.28.2008 Table of ContentsSection One: IntroductionSo, what is a MegaSquirtPNP?Everything has warning labels…
Section Two: InstallationOverview of connectionsTools RequiredInstalling your MSPNP
Section Three: Optional FeaturesAFM RemovalWideband Oxygen SensorKnock SensingLaunch ControlFlat ShiftBoost Control
Section Four: TuningInstalling MegaTuneWorking with MSQ FilesLoading FirmwareSettings to ChangeSettings NOT to ChangeSettings changed for specific modsInjectorsWideband O2 SensorsTuning for BoostOverboost Protection Boost ControlDataloggingGoing to the Dyno
Section Five: Modifying your MSPNPAdapter Board HeadersWiring a potentiometer type TPSMAP Sensor Upgrades
Section Six: The Complete Warning ListRead this...
Section Seven: VideosHow to set your base timing in MegaTune
Section One: IntroductionSo, what is a MegaSquirtPNP?The MSPNP is a racing Engine Management System that completely replaces the stock ECU. It takes over the functions the stock ECU provides – fuel control, ignition control, even cooling fan and air conditioning control – and lets you adjust these yourself by connecting a laptop to the MSPNP. It is designed to plug right into the harness and, if your engine is pretty close to stock, will even be able to get it started just like a factory computer. You will, however, want to fine-tune it in order to get the most out of your car’s potential. After all, this ability to tune the fuel and spark maps to match your engine is what a Standalone EMS is all about. At its core, the MSPNP uses a MegaSquirt-I with the V3.57 SMD board and MSnS-E (MS1-Extra) firmware, combined with an adapter board developed by DIYAutotune.com -- Bowling & Grippo describe the MegaSquirt as “an experimental do-it-yourself programmable electronic fuel injection controller.” With MSPNP, we’ve already done most of the experimenting, programming, and wiring needed to make it work with your Miata. But like all MegaSquirts, there’s still room for custom circuitry if you want to tinker with it, that’s one of the best parts about it—endless possibilities. We’ve provided an extra connector to let you add more I/O wiring, so if you decide you want to try out adding circuits of your own for features like nitrous control or water injection, you’ve still got room to add it. While we can’t cover a modified MSPNP under warranty, we’ll supply you hardcore DIYer’s with the information you need to modify it if you want. We’ll cover more about this in the 'Modifying your MSPNP' section later. For the majority of you—we’ve packed all the features you’ll ever need right into the core of the unit and you’ll likely never care to modify anything. We didn’t stop with the base featureset of the MegaSquirt but improved upon it a bit… read on. We’ve added a couple functions to the MSPNP that the original Miata ECU does not have. Some of these are built in, while others require a few changes to the wiring to access. Since MegaSquirt is a speed density system, it is possible to remove the air flow meter (AFM) to reduce intake restriction if you’d like to. You can set the rev limiter anywhere you want it, and chose either spark cut or fuel cut based rev limiting. We also have a launch control feature you can turn on that lets you rev the engine up to a lower rev limit when active. You can set this up to either activate the launch control with an added-on switch, or make the launch control active whenever you put the clutch in using the stock clutch switch. Also, MSPNP can work with a KnockSenseMS external knock amplifier to add knock sensing based timing retard.
Everything has warning labels…While most of the warnings about this will appear in the text discussing what the warning is about, there are a few words of caution before you start installing your MSPNP, to make sure it is appropriate for your Miata. First, the MSPNP is designed for racing applications and other cars that do not need to be emissions legal. It does not use the emissions control devices on the engine, nor is it’s base map tuning calibrated to pass an emissions test. The MSPNP is not waterproof. Then again, neither is the stock Miata ECU. It’s designed to be put in the passenger compartment, not under the hood or in places where it will get rained or splashed on. The MM9093 will properly fit in the stock ECU location on 1990-93 Miata. It does not use the factory brackets but can be attached to the floorpan. We will also be looking into offering extension harnesses for those of you who would like to relocate the MSPNP MM9093, allowing you to put it somewhere you can reach it if you’d like, or even to show it off if you’d like to. We have thoroughly tested the MSPNP MM9093 on multiple cars, and the ‘base map’ tuning should get a stock engine or a mildly modified one running with no problem. However if you are using this on a modified engine, the tuning may need significant adjustment to properly run your engine. You’ll want to dial in the settings before you really push the engine hard. Engines with significant modifications, particularly those running larger injectors, may need several settings changed before they will start at all (though setting it up for larger injectors is easy, and covered in this manual). Even if your car is stock you’ll still need to fine tune the base map for your car to ensure your car is safely tuned as all cars are different. You do not want to damage your engine due to assuming the base map is just fine for your car. It’s close, but don’t assume it’s perfect. GET IT TUNED IN! The MSPNP works with the stock Miata electronics, wiring harness, and sensors. As a general rule, it will work with almost any mod that works with the stock ECU, and many more. The only real exceptions where mods will work with the stock ECU but should not be used with the MSPNP are piggyback tuning systems, which may work in unpredictable ways or simply not work at all, or worst case could even prevent the MSPNP from running your car properly. As long as you are using the factory ignition system, you can add pretty much any mods available as long as you tune the MSPNP to work with them. You are only likely to run into trouble if you try changing the cam angle sensor or ignition module to something that does not work with the stock ECU. Being a speed density system, MegaSquirt will let you remove the factory air flow meter. (More details on this below). It calculates the amount of fuel to inject based on RPM and manifold pressure. The MSPNP MM9093 uses a 2.5 bar MAP sensor that can handle up to 21 psi of boost if you’ve turbocharged or supercharged your engine, though if you're not running forced induction you're still just fine with this sensor, you've just got a lot of headroom in case you ever go down the forced induction path...
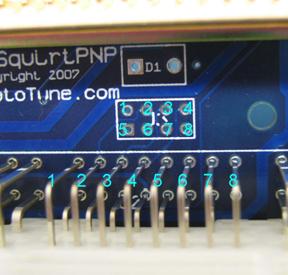
Section Two: InstallationOverview of connectorsSome of the features on the MSPNP box are rather obvious why they are there, such as the holes to mount it or the logo on the top to let everyone know what EMS you are running. But it has a few things on it are a bit different from the features on the stock ECU. The wiring harness connector is slightly different. The two outer connectors are identical to the ones on a 1990-1993 Miata wiring harness, and plug right into the Miata’s wiring. But there is a third section to this connector, right in the middle, that does not connect to the stock harness. This is there for letting you make your own harness for extra inputs and outputs. The top pins are numbered 1 through 8, left to right, and the bottom pins are numbered 9 through 16. Here are the pins’ uses:
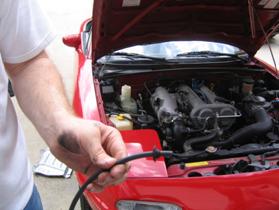
Section four provides information on wiring up pins 1 through 8. Next to the wiring harness connector is a small, round connector with four pins for connecting the serial cable. This connector is designed to provide power for various devices such as Bluetooth serial adapters or other devices that draw 5 volt power from a serial adapter. This connector is only meant to work with the DIYAutotune MSPNP Tuning cable; connecting video equipment or other inappropriate devices can damage either the MegaSquirt or the device being plugged in. Don’t do that ;). There is a small hole on the side. This is for connecting the MAP sensor. You can see the hose barb on the other side if you look into the hole. The sensor is designed to work with a rubber hose with around 7/64” - 1/8” inside diameter, included in the kit.
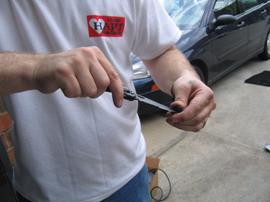
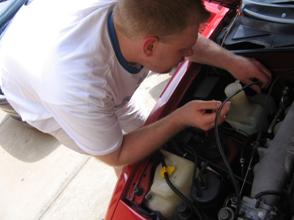
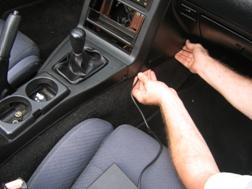
Tools requiredThe MSPNP requires very few tools and very little time to install. You will need: Timing Light (adjustable or not, doesn’t matter) Philips head screwdriver Flathead screwdriver 10 mm socket wrench with an extension bar Some installations may also require a 12 mm wrench for adjusting the cam angle sensor. You will also need a drill to make the holes for the sheet metal mounting screws and the MAP line grommet, and a knife or scissors for trimming the MAP line. Installing the MSPNP does not require any soldering or cutting any wires. However, it will be considerably easier to install the MSPNP if you have another person helping you for installing the MAP line.
Installing your MSPNP (READ THIS!!!!)
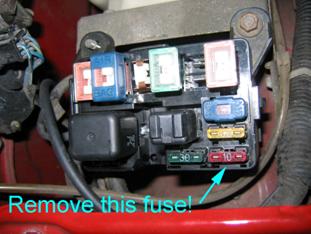
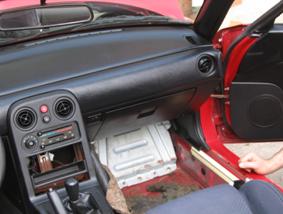
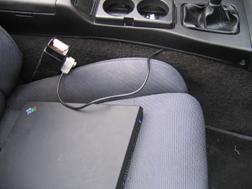
These directions cover how to put the MSPNP in the stock ECU location. Of course, you may want to make a few changes to these directions to locate it elsewhere in the passenger compartment if you want to show off your ‘dead sexy’ MSPNP box… and who wouldn’t?. Any place where the harness can reach and the MSPNP isn’t likely to be exposed to water or exhaust heat should be fine. There’s a reason Mazda didn’t put their ECU under the hood. YOU MUST REMOVE THIS 10amp FUSE! Leaving it in place can void your warranty!
Click here for a video on how to set your base timing in MegaTune
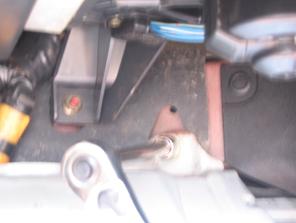
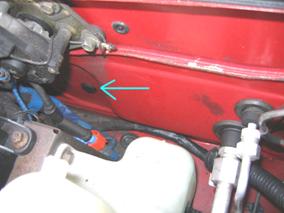
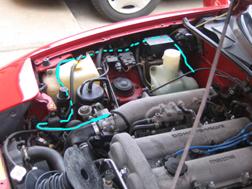
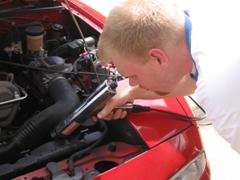
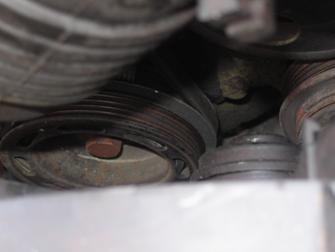
While you can adjust the timing in the same manner as a stock ECU, by adjusting the cam angle sensor, MSPNP gives you another option: adjust the trigger angle with MegaTune under the spark settings. Increase the trigger angle to retard the spark, or decrease it to advance the spark. Adjust the number until the timing is at 10 degrees. We’ve seen trigger angles from 50 to 68 degrees, and some engines may need it adjusted as far as 40 to 75 degrees. If the trigger angle is under 50 degrees, you should rotate the cam angle sensor to give you more trigger angle. MSPNP requires a trigger angle of 50 or more degrees to obtain full spark advance. The above picture shows the location of the cam angle sensor for adjusting the timing the conventional way or if you need to adjust the sensor to obtain a better trigger angle. Use a 12 mm wrench to loosen the bolt holding the sensor in place so you can adjust the sensor position. If you use this method for adjusting the timing advance, set the trigger angle to 55-60 degrees in MegaTune and turn the cam angle sensor until the timing is at a steady 10 degrees BTDC, then lock the cam angle sensor back down there and check the timing with the light to make sure the CAS didn’t slip. If you run out of adjustment, use the trigger angle setting in Megatune to get the correct timing.
The timing marks are on the front of the engine. The timing mark on the crank pulley may be hard to see; a dab of white paint down inside the mark (wipe off the excess) can help here. Once you have adjusted the trigger angle and/or cam angle sensor to get 10 degrees BTDC, turn off the fixed timing mode by changing the “Fixed Angle (-10 = use map) (Deg)” setting to -10.
Section Three: Optional Features
This completes the basic installation of your MSPNP. It’s now ready for you to start fine-tuning it to match your particular setup—you can continue to the next section for more on tuning. However, there are several other connections and mods you can add to use the MSPNP’s extra features. AFM Removal
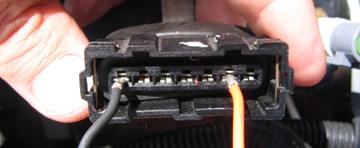
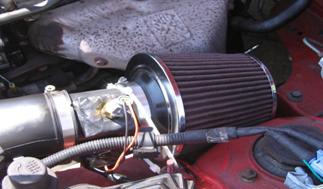
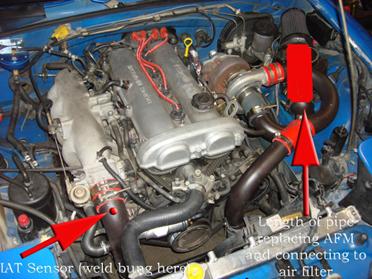
MSPNP allows you to disconnect the air flow meter. When you remove the air flow meter, you will need to install a GM style intake air temperature sensor in your intake. This sensor connects to the first and sixth pins on the IAT connector, as shown in the photo. IAT sensors have no polarity, so it does not matter which wire you connect to which pin. After installing the intake air temperature sensor, you will need to reload the firmware (see Section Four). The wires should then be folded down over the edge of the AFM connector, and the whole assembly firmly and cleanly wrapped in high quality electrical tape sealing it up. 3M makes some good stuff that can handle the temps found in engine bays-- read the specs. The IAT needs to be located where it will pick up the air temperature after anything in the intake that changes air temperature. So if you are using forced induction, it needs to be downstream of the turbo or supercharger and the intercooler. Here is a picture of an IAT sensor installed in a naturally aspirated car, with a cone filter taking the place of the stock airbox. And here’s a picture of one way to bypass your AFM and still get your air filter on there (using a popular turbo kit and charge pipe kit), and more importantly, it shows you exactly where to weld the IAT bung to measure air temp AFTER the turbo, and AFTER the IC. You need to know the air temp as it’s entering the engine, nothing else will do us much good. If you are running forced induction this is critical, the stock IAT sensor in the AFM will not do.
Wideband oxygen sensorThe MSPNP can work with many aftermarket wideband sensor systems such as the Innovate Motorsports LC-1 which is the system we recommend for ease of install and use. You will need to connect the MSPNP to a programmable analog output from the wideband sensor’s controller, and install the controller according to the manufacturer’s directions. You should ground the wideband to the engine block near the factory ECU ground wire to ensure an accurate signal. There are two ways of connecting the controller to the MSPNP. You can either connect the analog output to pin 10 of the MSPNP center connector, or you can cut and splice the oxygen sensor signal wire to the analog output. If you use pin 10 for wideband input, you must disconnect the stock oxygen sensor. Do not ground the oxygen sensor wire if you disconnect it; leave it completely unconnected and taped off if necessary (make sure it can’t short to ground or anything else). After connecting the wideband sensor controller, you will need to change a few settings on the MSPNP. Section Four has the details of how to change this.
Knock sensingThe MSPNP is set up to use a KnockSenseMS knock sensing amplifier. Install the KnockSenseMS according to the directions, and connect the terminal marked ‘Tim’ on the KnockSenseMS to pin 11 on the center connector of the MSPNP. This connection is not designed to connect directly to a knock sensor or other knock input controllers; it was designed specifically for the KnockSenseMS available at https://www.viatrack.ca Launch Control(clutch switch jumper wire required at center connector, or you can wire a separate switch/button) You can use either the stock clutch switch or an external switch for launch control. To use the stock clutch switch, connect pins 12 and 13 together on the center connector. If you want to use your own switch for launch control, connect pin 12 to one terminal of a momentary contact switch and the other terminal on the switch to a chassis ground. Launch control is turned off by default in the tuning software—you can access it’s config in Megatune from the ‘Advanced’ Menu under ‘Launch Control’.
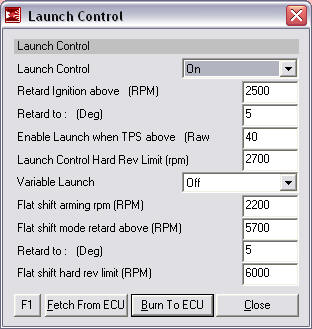
Flat Shift(clutch switch jumper wire required at center connector) Flat Shift enables you to keep your foot in the throttle while shifting to keep the revs (and boost for you turbo guys) up. Perfect for drag racing... make sure your clutch and drivetrain can handle it though... So instead of clutch, off throttle, shift, on throttle as you de-clutch, you stay on the throttle the whole time and clutch, shift, declutch while the throttle stays on the floor. The ECU takes care of making sure you don't over-rev. You need to set it up first however... The settings are on the bottom section of the Launch Control screen on the Advanced Menu. These settings seem to work fairly well on our shop Miata:
Don't turn Variable Launch on when using a clutch switch.
Boost ControlPin 9 on the center connector is an output for boost control. To use boost control, connect one terminal of a fast acting solenoid valve to a 12 volt source that turns on with the ignition, and the other terminal to pin 9 of the MSPNP MM9093 center connector. The fast acting solenoid valve plumbs into the line running from the intake to the wastegate. NOTE-- while many EBC valves could be used, we recommend using the GM Boost Control Valve available from us. This is the valve we have tested with, and have setup the base maps to support. Assuming you are using this valve, you'll wire it up with the + terminal on the valve body (there's a small plus next to the where the wiring connector plugs in) to a switched 12v source. The white/red wire feeding into the diagnostic connector is a nice convenient 12v source on a Miata. Then you'll run the other wire back to pin9 on the center connector of the MSPNP MM9093. Run a vacuum line from the boost source (between the turbo and the throttle body somewhere) to the silver nipple on the EBC valve, and run another vacuum line from the black port on the EBC valve to your wastegate. Leave the filter on the third port alone. See the EBC tuning information in the Tuning section below for more info on tuning boost control.
Section Four: TuningWith the MegaSquirtPNP, tuning is not very different from other MegaSquirt varieties. You can find in-depth information on tuning MegaSquirt in the MSExtra Manuals, available online at https://www.msextra.com/manuals/MS_Extra_Tuning_Manual.htm Additionally, you will want to check out the guide to MegaTune: https://www.megamanual.com/v22manual/mtune.htm
Our guide is sort of a quick start guide, as well as an explanation of the unique features of the MSPNP. The standard MegaSquirt manuals contain much more in-depth information about the tuning process.
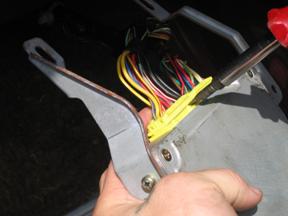
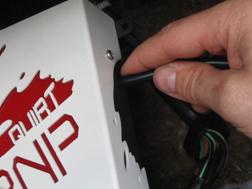
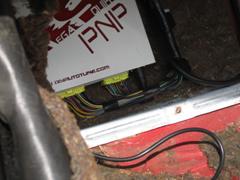
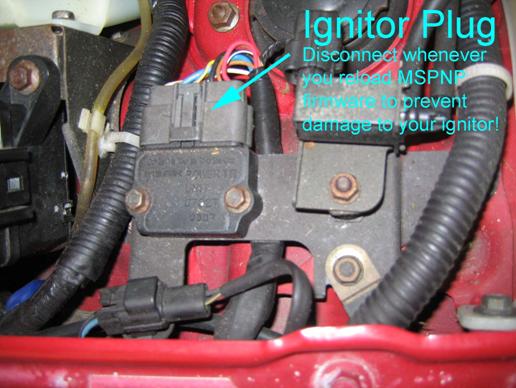
Installing MegaTuneThe MSPNP comes with a CD that includes MegaTune and all the files needed to tune your EMS. Installing MegaTune from the CD is the most reliable way to set up MegaTune for MSPNP, as it will already configure your copy of MegaTune for the code that comes with the ECU. If the installation program does not automatically run when you put the CD into your CD drive, you can right click the CD drive in My Computer and double-click Setup.exe. During the Software Installation, you will be prompted to select which 'type of installation' you want. This is your chance to choose which version of the MSPNP you want MegaTune setup for, select the proper model from the dropdown menu and continue. When you run MegaTune, it will prompt you to select a project. Select the MSPNP MM9093 version that corresponds to whether you have the AFM removed or have it installed. You will also need to specify the correct COM port under the Settings -> Communications menu. Working with MSQ files (MegaTune Maps)MegaTune stores the information from MegaSquirt in MSQ files. The MSQ file contains all of the adjustments and settings needed to run MegaSquirt on a particular engine. These let you back up your tuning or compare your settings with other MegaSquirt users. The MSPNP CD comes with a base MSQ file. We’ve tested this one out on a stock Miata, and it should get most cars with basic bolt-ons to start up and run too. Even if your car is stock, you will want to fine-tune it to your particular engine, as every car varies just a bit. If you’ve added any significant mods, you will definitely want to do some good tuning before really pushing your engine to its limits. But if you find yourself getting lost and having trouble with your tuning, you can go back to this default tune to make things work again as a baseline. The base map is intended as just that however: a ‘base’ map. It was tuned on 93 octane fuel, and in theory is somewhat conservative. Fuel is different from state to state, and pump to pump, so what is in theory conservative here may be aggressive on your fuel. AT A MINIMUM RUN THE BEST PUMP FUEL AVAILABLE, AND GET IT TUNED IN, AND KEEP RUNNING THAT FUEL OR BETTER. On a stock car EXACTLY like ours, in EXACTLY the same condition, this map should make similar power to stock, maybe a bit better—though we recommend only running premium fuel, and getting the system properly tuned for your car as soon as possible. With this EMS you have full control of all aspects of engine management on your vehicle. You will get excellent results when properly tuned. Though giving you that level of control means you also have the power to melt down your engine in a hurry if you don’t tune the engine properly. The power to tune is just that, very powerful… Do it right the first time, and if you’re not confident in your ability to do so get a professional tuner to assist you on a load-bearing steady state dyno where the maps can be properly tuned in for your car. Once that’s done by a qualified tuner, you can rest assured that your engine is safely making all of the power that it can make. If you go to File -> Open in MegaTune, you can open a MSQ file and it will load it into your MegaSquirt. This will overwrite all the settings you currently have saved in the MegaSquirt’s memory. MegaTune will confirm that you want to do this. If you see a dialog box appear with a warning that there are warnings when you open the MSQ file, you should cancel this until you can investigate further. Feel free to contact our support team and we'll help you quickly determine what may be causing the warning.... or look in your Audit.log file (MegaTune folder) and you can likely determine if it's anything to be concerned about. If you want to open a file just to examine it, the safest way is to open it with the MSPNP disconnected. Then you can go to the File menu and select Offline. MegaTune will still prompt you if you want to burn the values into the controller. You should tell it No. You can then examine the settings in the MSQ file without loading it onto your MegaSquirt. The Save command under the File menu will save your settings. MegaTune will automatically suggest a name based on the time you have saved the file, or you can specify your own file names. You can share MSQ files with other MegaSquirt users though it can be risky business if you are not careful. It's easier and generally safer to copy a MSQ file from another MSPNP user running the same model you are running, but you can also use maps from standard Megasquirts if you first set the spark, input and output settings to match the ones in the MSPNP base map. There are a few words of caution when sharing MSQ files. First, you will need to make sure it is from the same firmware release, or at least a compatible one that uses an identical MSQ format. You will see a warning if you try to load one from an incompatible firmware version; don’t ignore this warning. Second, non-PNP Megasquirts may use different outputs from a MSPNP. You will want to check to make sure the Codebase and Output Functions and Spark settings are exactly the same before loading a non-PNP Megasquirt map into your MSPNP. If these are not set correctly, you may damage your ignition system or accidentally disable certain features of the MSPNP. The last potential source of trouble when sharing MSQ files is that a different owner’s MSQ file may not be right for your engine. It may be tuned for an engine with different modifications, or may have a few mistakes in it's tuning. Loading an untested/untuned MSQ file just before a race and going out for a few laps without tuning it can be a recipe for disaster. If you are not 100% sure of what you are doing, then don't, you risk burning your ignitor and coil and/or damaging your ECU. The base map provided is very good and will get you well on your way to a well tuned car, you will need to fine tune your car no matter where you get your 'base map' from, so you're best bet is to put your car on the dyno, using our base map to start from, and dial it in on your car.... no guesswork needed! Loading FirmwareThere are times you may need to reload the firmware. There are likely to be firmware updates available from time to time though note that the firmware on your MSPNP unit has been custom calibrated for your car’s sensors and using firmware directly downloaded from the MS-Extra site would also need to be calibrated. YOU MUST DISCONNECT THE IGNITOR WHEN YOU ARE RELOADING FIRMWARE, AND LEAVE IT DISCONNECTED UNTIL YOU HAVE LOADED YOUR MSPNP MSQ FILE. LEAVING THE IGNITOR CONNECTED WILL USUALLY RESULT IN DAMAGE TO THE IGNITOR. The ignitor connection is shown in this photo.
To download the firmware, go into the MegaSquirt folder and select the “MSPNP MM9093 with AFM” folder if you are using the stock AFM and sensors, or the “MSPNP MM9093 without AFM” folder if you have removed the AFM and installed a GM style IAT sensor. Power up the MSPNP, disconnect the ignitor plug shown above, and connect the MSPNP to your computer. Close any programs such as MegaTune that communicate with MegaSquirt. Run the file named “download-firmware.bat”. This will launch the downloading program. The downloading program will first prompt you for your COM port, and then ask if you are using a boot jumper. The MSPNP already has MSnS-E firmware loaded, so when the program asks if you are upgrading from standard MegaSquirt code, press N. Once you press N, the download will begin. Do not turn off the MSPNP, plug in the ignitors, or close the downloading program until the download is complete. Normally you do not need to install a boot jumper or open the ECU to reload firmware. Once the firmware download is complete, you MUST reload the base map, or your updated map which was based on the base map, before reconnecting your ignitor. The .msq file for the base map will be located in the same folder as the firmware update above. Load the base map .msq file using the File -> Open command in MegaTune, and then you can reconnect your ignitor.
Settings to changeMegaSquirt lets you tune all of its settings. Here are the settings that are particularly important for tuning your MSPNP to get the most out of the mods on your specific engine. The two main controls, the spark and VE (fuel) tables, work in the same way. You can access the table directly and fill in values, or you can go to the Tuning menu and adjust them on a 3-D display. When viewing the table directly, note that you can change the bins on the kPa and RPM axes. You can move these around to accommodate boost or a higher RPM limit, or space a couple bins more closely if you run into any spots that are difficult to tune. The spark advance table is located under the Spark menu, as Spark Table 1. This table gives the spark advance in degrees as a function of engine RPM and manifold absolute pressure. The best way to tune this table is on a steady-state chassis dynamometer, but you can often get significant power gains by dialing in the ignition on a dyno. The VE table represents a correction factor from how much fuel the MegaSquirt would inject if you were running a stoichiometric (14.7:1) air to fuel ratio, and the engine actually pulled in a volume of air equal to its own displacement every engine cycle at the temperature and pressure that MegaSquirt measures. You use the VE table to correct for both the engine’s actual volumetric efficiency and to change the air/fuel ratio to richer or leaner as the engine requires. Increase the number in a cell to add more fuel at that MAP / RPM combination, and decrease the number to inject less fuel. The acceleration wizard lets you adjust the amount of fuel added when you suddenly hit the gas pedal. Unless you have made the modifications necessary for a potentiometer based TPS, you will be working with MAP-based acceleration enrichment, and leave the MAP vs TPS slider to 100% MAP. You can adjust the extra pulse width to increase or decrease the amount of fuel added based on how quickly the manifold pressure changes. MSPNP incorporates a two stage rev limiter. The soft rev limit sets the ignition timing to a fixed angle labeled Soft Limit Absolute Timing, while the hard cut can shut down the ignition, fuel, or both. If you set the soft limit absolute timing to 5 degrees, for example, any time the engine exceeds the soft rev limit the ECU will set the timing to 5 degrees. This is not how many degrees it cuts from the timing. If you set it to 45 degrees, you won’t cut 45 degrees from the timing. Instead, the timing will advance to 45 degrees BTDC, which could be very dangerous! As a general rule, you should only use the spark cut rev limiter by itself if the car is not equipped with a catalytic converter. Cars with catalytic converters should use the fuel cut rev limiter, either on its own or in combination with spark cut. Turning off the ignition without cutting the fuel will dump raw fuel into the exhaust and can damage the catalytic converter. The launch control is based on a rev limiter. If you turn it on using the stock clutch switch (Jumper enabled on the middle connector), it will activate when the transmission is in neutral or you push down the clutch, every time after you first put the car in gear and take your foot off the clutch. When you have the launch control active, the rev limits drop to the limits specified on the launch control screen, letting you rev the engine up to a fixed RPM that you can adjust. When you release the switch, the rev limit is removed and you take off… nice and controlled.
Settings that should not be changedThe MSPNP does not lock you out of any of the settings. As MegaSquirt is by nature a universal ECU that encourages experimentation, education and further development, there are several settings used to configure the ECU to use the sensors and ignition system on a wide variety of engines. We’ve configured the MSPNP for the Miata ignition already, and changing some of the settings can cause it to stop working with your engine, or worse, damage your engine or electronics. In addition, there are several settings and options for features not installed on the MSPNP. Here are some areas which you should not adjust, and settings that should only be adjusted if you have modified your ECU to enable them. The Basic Settings menu contains two options that need to be left as they are. The Codebase and Outputs Function menu should not be altered unless you have modified the MSPNP for extra outputs, and you should not touch the Wheel Decoder Settings at all. The Spark menu also contains many ignition settings that do not change. The only settings to change under the Spark Settings box are the Trigger Angle and the Fixed Angle options, which are adjusted when setting base timing only. The Stim for Wheel (always set to OFF) and Rotary Trailing Settings are also options that you should not modify. In addition, the following menu options require or make references to hardware modifications not factory installed on the MSPNP MM9093:
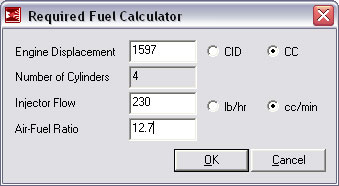
Settings to Change for Specific ModsMany mods will simply require tuning the VE and spark tables to fit. Modifications to the sensors and fuel system, however, require specific changes to the settings. Here are the recommended changes for some common modifications. InjectorsMSPNP can drive a wide variety of injectors, typically when using the MegaSquirt on Miata’s users have reported better results with High Impedance injectors. We’d suggest the same until we’ve done further testing to ensure that this was a limitation or mis-configuration of a specific user’s setup and nothing else. High Impedance injectors are available for the Miata up to 550cc which will handle most of your needs. When you change the injector size, MegaSquirt can handle most of the adjustments with just one variable, REQ_FUEL, which sets the base pulse width. MegaTune can calculate this value automatically if you click the Required Fuel button on the Engine Constants page, where you just need to enter your engine size and injector size, as well as 12.7 for the air/fuel ratio. Using that A/F ratio will reduce the amount of tuning needed when you change injectors significantly as that’s what was used for the req_fuel calculation on the base map with stock injectors. Yes we know the MegaManual advises uses 14.7 for gasoline as the stoich ratio, please note that, within reason, it doesn't matter and there was a reason we chose to use a different AFR here. If you're wanting to scale for different injectors with minimal re-tuning then use the AFR we recommend. If you are going to fully retune anyways then feel free to use 14.7 as the AFR. It won't effect your ability to tune your car properly at all. It will effectively scale your entire VE table a bit. Here are the settings we used on the base map to come up with a REQ_FUEL of 13.4:
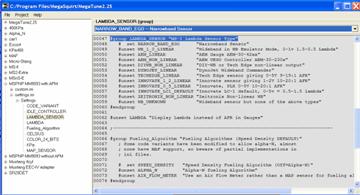
There are a few settings which do not adjust when you change REQ_FUEL as they are static pulsewidth (PW) settings, so you will need to adjust these by hand. The acceleration enrichment settings will probably need to be retuned for the new injectors. Also, larger injectors require shorter cranking pulse widths. If you double your injector size, you will need approximately half the cranking pulse width. As a general rule, it’s easier to fine tune the cranking pulse widths by setting them to a lower value than expected, and then increase this in 0.1-0.2 millisecond increments until the engine starts. This will make it less likely that you flood the engine. For both the cranking PW and Accel Enrichment PW you can do much of the adjustments using math—then do the rest via fine tuning. For example—you need to first subtract the injector opening time from your current numbers. Injector opening time by default is set to 1.0ms. So if your Cranking PW at 100degF is 4ms, subtract 1.0ms from that and you have 3ms. Now, that that 3ms and divide it by the percentage of the size difference of the new injectors compared to the old. If you had 20lb stock injectors, and you’re going to 42lb injectors, you’ll need about ½ the cranking PW minus the opening time. So in this case, ½ that 3.0ms is 1.5ms. Add that 1.0ms injector opening time back and you’ve got 2.5ms. Your old cranking PW at 100degF was 4ms, your new time at the same temp is 2.5ms. This should be pretty close to what’s needed. Do this for all cells in your cranking PW and Accel Enrichments and you’ll be close with only fine tuning remaining. After swapping in new injectors and making these adjustments, it’s a good idea to make sure your air-fuel ratios are still where they should be. Sometimes the VE table will need a bit of fine tuning due to differences in the way injectors behave, and it’s also a math check for the changes you just made. Make sure the air-fuel ratios are good before pushing the engine hard after an injector swap. Wideband oxygen sensorsMSPNP supports many common wideband oxygen sensor systems, including the Innovate Motorsports LC-1 / LM-1 line (LC-1 is our wideband of choice) and most other systems that provide a programmable analog voltage output. There are a few changes needed to the software settings to make in order to properly display and use the wideband sensor input. To make MegaTune display the output correctly, select Configurator from the MegaTune Program’s File menu, or from the MegaTune group in your Start Menu. This will open up the configuration program. You will see a list in the left hand column of the Configurator that starts with MegaTune2.25 and then includes a list of project cars. The project you will use is either “MSPNP MM9093 with AFM” or “MSPNP MM9093 without AFM”, depending on whether you have kept the factory AFM or removed it and used a GM style IAT sensor. Click the plus sign in a box next to the project to expand the options under this one, then expand settings.ini, and then expand Settings. Then select LAMBDA_SENSOR. You will see a menu of aftermarket wideband controllers at the right. Select the one that corresponds to the controller you will use. The LM-1 default will use the INNOVATE_1_2_LINEAR if you are using its default volt meter settings, while the LC-1 will use the INNOVATE_LC1_DEFAULT settings if you have not changed its outputs. Note that the Innovate products and many others have programmable outputs, and these options are simply for the default configuration. Adjusting the LM1 to use a wider range of output voltages, such as setting it to give 0 volts at 10:1 AFR and 5 volts at 20:1 AFR, will reduce the effects of noise in the input. This is recommended for best performance though you will need to program your LC-1 or LM-1 outputs to match, that’s easy though. Once you have specified the wideband settings, go to the File menu and select Save. Then you can run MegaTune and have it display the correct air-fuel ratio. Once you have set the Configurator for the sensor, you will need to change a few settings in the MegaSquirt’s memory using MegaTune. You will find most of these in the Exhaust Gas Settings option under the Basic Settings menu. You will need to set the EGO Sensor Type to Wide Band, and change the EGO Switch Point to the voltage that your controller sends for a 14.7:1 air fuel ratio. The MegaSquirt will try to maintain this air-fuel ratio when running in closed loop mode. The Controller Authority setting limits how much it can change the amount of fuel delivered, so that a faulty sensor can only cause the engine to be off by a small amount. The Open Loop Mode settings under the More Settings menu regulate when the MegaSquirt will start ignoring the oxygen sensor input. Unless you have modified the MSPNP to use a potentiometer TPS, you will need to set this to KPa. This lets you turn off the oxygen sensor correction above a given manifold pressure. However, if you have a wideband oxygen sensor, you do not need to turn off this correction at full throttle like a factory ECU. Instead, you can make MegaSquirt target a lean air-fuel ratio while cruising, and go to a rich air-fuel ratio under boost – and have the oxygen sensor help you target both. To enable this, select Lambda AFR Settings from the More Settings menu, and turn on the 8 x 8 AFR target table for VE Table 1. Once this is on, you can go to the AFR target table and set your targets as a function of manifold pressure or boost and RPM. The values in this target table will be the raw voltage output from the oxygen sensor controller, not actual air-fuel ratios. MegaTune is also able to tune the VE tables on its own, based on inputs from a wideband sensor. This feature is called AutoTune. The software will adjust the VE tables in a limited range to make the air-fuel ratio match your target settings. Use this feature with caution and make sure your targets and sensor readings are correct before you enable it. You will usually still need to do fine tuning by hand. You should not rely entirely on AutoTune mode to get your car in tune. Boost (Tuning for it)When setting up MSPNP on a boosted Miata, you won’t have to change very many settings other than properly tuning the VE and Ignition tables for the additional airflow and load. Start with making sure your VE and spark tables go up to the maximum amount of boost you plan to run. Since boost is gauge pressure and MegaSquirt works in absolute pressure, this table will help you convert the amount of boost to the maximum KPA level. These values go just a little above the maximum boost setting.
The MSPNP is equipped with a 2.5 bar MAP sensor, so the maximum amount of boost it can read is 21 psi of boost. While higher amounts of boost will not damage the sensor in most cases, it can damage your engine if you do not tune for it. The MSPNP will not add any more fuel above 21psi to compensate because it cannot detect the extra air, which can result in dangerous lean conditions if you boost beyond that point. Since MSPNP is a speed density system, you do not need to recirculate the air in the intake. If you want to you can go ahead and install a monster blow off valve and vent it to the atmosphere without worrying about having it throw off your measurements.
Overboost ProtectionThe MSPNP base map has a default Overboost Protection limit set of 152kpa which is about 8psi. This limit is there to prevent an overboost condition and to protect your motor. When the threshold it reached injector PW will be cut to 0 for a split second until MAP drops below the limit. Therefore with the default settings if you try to boost near or over 152kpa you will feel the engine cut out when Overboost Protection kicks in. This can feel like a single cut, or it can feel like the car is erratically cutting out if you stay on the throttle and continue to bounce off the limiter. To change the Overboost Protection limit from MegaTune, open the Advanced menu, select 'Over Boost Protection', and set the new limit in kpa.
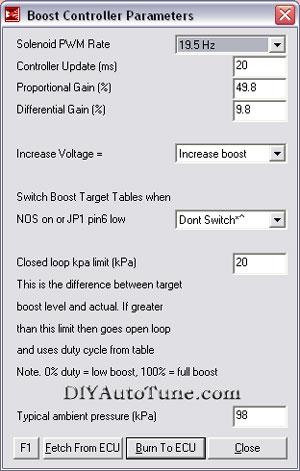
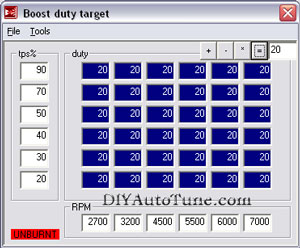
Boost ControlThe MSPNP has an electronic boost control feature supporting open loop boost control. There is also experimental closed loop boost control code, though it has not been thoroughly tested and should be considered experimental code at this point. Open loop works great though. Once you have wired this up, you can enable boost control in MegaTune. As mentioned it is best to set this up in open loop mode, so the boost control solenoid puts out a signal at a fixed duty cycle (that is, percentage of time the solenoid is open) as a function of RPM. The boost control software was designed for use with a throttle position sensor, but don't worry, it still works well without one though at effectively 1x8 resolution (boost isn't variable based on throttle position as it is not aware of throttle position without a TPS in place). If you find the boost control settings are not available in the MegaTune menu, go to the Codebase and Output Functions menu and set the X4 (JS2) function to Boost Control. When running boost control, you'll set up the basic parameters for the valve under the Boost Control screen in the Advanced menu. It's considerably easier to tune the open loop settings, so the only things you need to set here are to adjust the solenoid PWM rate (this will depend on what solenoid model you are using for boost control) and set the closed loop kPa limit to zero. Once you have these set up, you can go to the boost duty target screen and set up the duty cycle rate as a function of RPM. Since there is no TPS unless you have modified the unit for potentiometer TPS, you will want to set all the bins for a given RPM level to the same percentage. If the solenoid disconnects the wastegate from the manifold pressure line when energized, more duty cycle means more boost. If the solenoid normally has the wastegate disconnected from the manifold pressure line and only connects it when energized, more duty cycle means less boost. The duty cycle ranges go from zero to 100. Set them to a value that will give low boost at first, and adjust as necessary to get a good boost level. NOTE-- while many EBC valves could be used, we recommend using the GM Boost Control Valve available from us. This is the valve we have tested with, and have setup the base maps to support. Practical Boost Control Tuning and base parameters using the GM Boost Control Valve
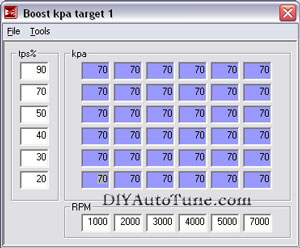
Basically, the top 5 settings are valve specific, we're not setting this up for use with Nitrous so setting #6 is set to 'don't switch'. Typical ambient pressure may need to be tweaked a bit to what your typical ambient pressure is according to your MSPNP's map sensor. So power your MSPNP up (key on) but don't start the car, and see what the ambient pressure is there in kpa in MegaTune. Put this number in this field. It's usually high ninety's unless you're at high altitude. Lastly, the 'Close Loop kpa limit' setting. This we've got set to 20 kPa. This tells the MSPNP to go into open loop mode any time the kpa reading is more than 20 kpa away from what you see in the table on the right. You'll notice we've got the table on the right set to all 70's. That's intentional. We want the boost control to operate in open loop mode, and then is how you make that happen.
Bottom line, start at low DC's, make small changes, and analyze the results of each pull. Remember that as you add boost you're getting into previously untuned areas of your fuel and spark tables and you'll need to adjust those.
DataloggingMegaTune can log the MSPNP’s input and output readings to help you dial in your tune, and it can also be a great diagnostic tool. You can activate this by pressing Alt-L or going to File -> Datalogging -> Record. MegaTune will start recording, and continue saving a data log until you close MegaTune or turn the logging off. You can then play back these logs with MegaLogViewer to see if your tuning delivers the right air-fuel ratios throughout the RPM range, or use this to spot problems with the tune.
Going to the DynoEveryone should properly dyno tune any standalone EMS to get the most out of their car, and the MSPNP is no different. However dyno time is very expensive diagnostic time-- you want to have your car sorted before you go. You don't want to show up to the dyno with your MSPNP in the box along with your set of 550cc injectors and new boost controller.... that's asking for trouble. Go ahead and get the car running on the configuration you'll be tuning before you get there. If you're running bigger injectors for example, install the MSPNP first and get that tested and running, then install the bigger injectors, scale the REQ_FUEL, AE, and Cranking PW on your MSPNP for the bigger injectors, and again make sure it's properly sorted. If you're removing the AFM, go ahead and do that as a separate stage as well, testing afterwards. The idea is to make only one change at a time, so that if there is an issue somewhere you know where to start looking. Pre-Dyno Maintenance-- Make sure there are no leaks, you've got fresh oil, fresh plugs and good wires, your air filter is clean, etc. If you've turbocharged a factory n/a car then you should be running plugs at least one step, probably 2 steps, colder than stock. You should probably also gap them a bit tighter than stock. On Miata Turbo cars it's pretty normal to run the NGK BR7 range of plugs, and gap them at .026 - .027. You wouldn't believe how many people get their car to the dyno and aren't ready to have their car on the dyno! Be ready! To prepare the MSPNP for dyno tuning-- Disable EGO Correction before
you tune: BASIC SETTINGS: EXHAUST GAS SETTINGS (Set Controller Step Size to 0).
After tuning set it back to 1.
Section Five: Modifying your MSPNPNo, we are not able to cover an MSPNP under warranty if you open the case and make any changes inside it. But if you want to modify the MSPNP to use a throttle position sensor, control nitrous, or add other capabilities, you can. Most of the information on how to modify a MegaSquirt is found in the MSnS-E manual. This section simply covers the specifics of dealing with the MSPNP adapter board as well as some Miata-specific information. Adapter Board HeadersThe MSPNP has a header with eight pins for using the top row of wires in the center connector for spare inputs and outputs. This header lets you add wires for using spare inputs or outputs. Each header pin connects to the pin with the corresponding number on the center connector. There are also two holes for extra unused wires in the ribbon cable. Here is a diagram of which of these jumpers in the header correspond to what jumper on the main board. On the outside middle connector these pins are numbered 1-8 from left to right on the top row, and 9-16 from left to right on the bottom row.
Spare/Unused I/O Available for mods without repurposing anything
If you need more input or output wires, you can run some custom jumpers from the spare header on the MSPNP adapter board to whatever circuit you have constructed on the main board.
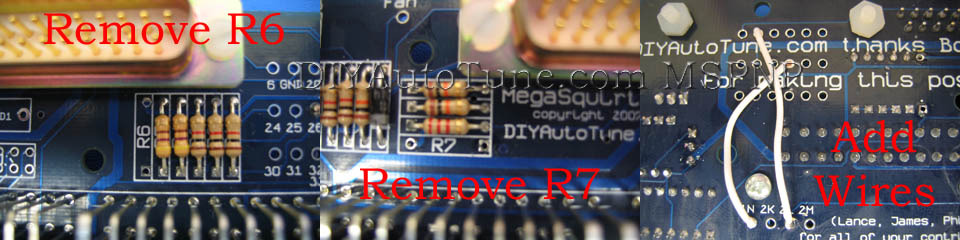
Wiring up a potentiometer type TPSThe stock switch-type throttle position sensor does not provide very much useful information to MegaSquirt, so it is not connected. If you want to modify the MSPNP to use a potentiometer type TPS, here’s what you need. First, remove the TPS stabilizer resistors, R6 and R7. These are the "through-hole" resistors on the daughter board, not the surface mount R6 and R7 resistors on the V3.57 daughter board. Then you will need to connect the TPS signal and reference wires to the Miata harness. There are four holes that access pins on the Miata connector on the underside of the MSPNP board. Solder a jumper from the 5V VREF hole to 1N, and another jumper from the TPS hole to the 2L hole. This will bring the MegaSquirt’s connections out to the Miata wiring harness. This picture shows where to change the wiring.
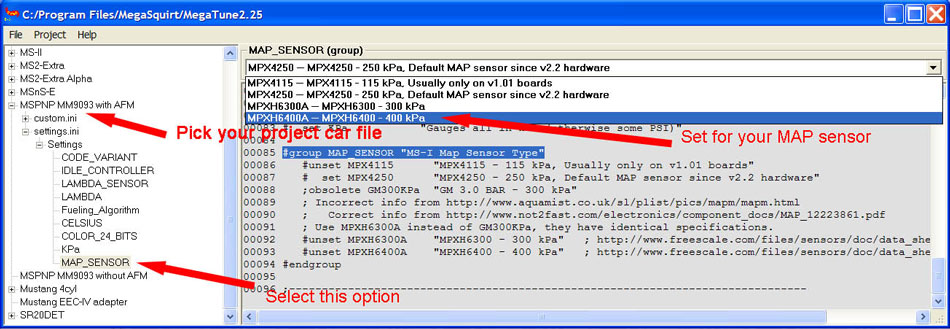
At the throttle position switch plug, you will have three wires. If you have modified the MSPNP as described, the red will supply a 5 volt reference voltage, the green and white wire will take the signal back to the MegaSquirt, and the black and green wire will provide a ground. If you’re not sure which connection on your TPS goes to which wire, check it with an ohmmeter. Observe the resistance as the throttle opens and closes. Each pair of pins will behave differently: The resistance between the 5 volt and ground pins will remain constant. The resistance between the ground and signal pins will be low with the throttle closed and high with the throttle wide open. The resistance between the 5 volt and signal pins will be high with the throttle closed and low with the throttle wide open. Using these rules, you can establish which pin on the TPS goes to which wire. MAP Sensor UpgradesThe MAP sensor is located underneath the main MegaSquirt board. You can remove it to install a MapDaddy 4 bar MAP sensor if 21 psi of boost just isn't enough. Installing it is no different from installing an upgraded MAP sensor on a regular MegaSquirt, except that the location of JS5 has moved a little bit. The MSPNP can be modified to work with other voltage-based MAP sensors that give a 0-5 volt output. Once you have installed the MAP sensor upgrade, there are a couple of changes to make. One is in the MegaTune Configurator. Pick your project and select the MAP_SENSOR option, then set it to a 400 kPa sensor. Once you have made this change, go to the File menu and save your settings.
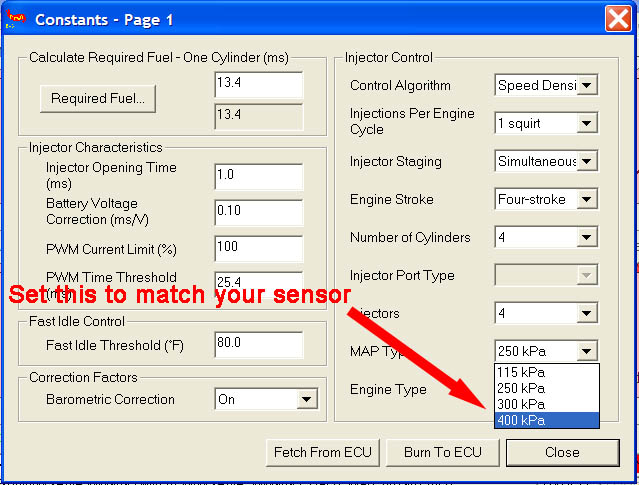
Once you have set this up in the Configurator, you can then set MegaTune to use the MAP sensor. Go to the Basic Settings menu and bring up Engine Constants 1. This screen allows you to specify which MAP sensor you are running.
If you have added a MapDaddy or second MAP sensor for barometric correction, you can also enable this from the Barometric Correction screen in the More Settings menu. Specify that you have an extra MAP fitted to X7 (an older name for the barometric correction port dating back to the V2.2 boards) to let the MSPNP correct for altitude in real time. You'll also need to enable Constant Baro Correction on the 'More Settings' > Barometric Correction' screen. This can be handy if you are driving through major elevation changes. If you'd like, you can specify the kPa range for which barometric correction will be in effect from the 'More Settings' > Barometric Correction' screen as well.
Section Six: The Complete Warning List
READ ME! READ ME! READ ME!
The MSPNP is not designed to control emissions equipment and is not intended for use on pollution controlled vehicles. Check local and federal laws before you even consider such a thing.
You must remove the ST SIGN fuse from the fuse box when installing MSPNP, and do not reinstall it as long as the MSPNP is installed on the car. Having this fuse in place will cause damage to the MSPNP MM9093.
Disconnect the ignitor when reloading code, and load a valid MSPNP map before connecting the ignitor. Leaving the ignitor connected when loading code will damage the ignitor.
The MSPNP is not waterproof and is not designed to be mounted in the engine compartment or other places you would not want to mount the factory Miata ECU.
While the standard tuning is very close for a stock Miata, and should work pretty well on cars with minor modifications, it’s possible to damage the engine if your tuning is too far away from what your engine needs. Verify that any tuning files you have from other users work correctly on your car, as they may be tuned for different modifications. Make sure your unit is properly tuned for your engine before racing or otherwise pushing your engine to or near its limits.
The standard MAP sensor in the MSPNP can handle up to 21 psi of boost. It is not able to accurately measure air at higher boost pressure levels.
The knock sensing input is designed for use with a KnockSenseMS external amplifier. It is not designed for use with other aftermarket knock amplifiers, or for connecting a knock sensor directly.
If you use pin 10 for wideband oxygen input, you must disconnect the stock oxygen sensor. Do not ground the oxygen sensor wire if you disconnect it; leave it completely unconnected. And do not attempt to plug a wideband oxygen sensor directly into MSPNP; you should connect the sensor to a controller and the controller to MSPNP.
Do not plug an S-Video monitor or anything other than a DIYAutotune serial adapter cable or equivalent into the four pin socket.
The AutoTune function in MegaTune needs to be used with caution. Make sure that the target settings are appropriate and the wideband sensor is working correctly before engaging AutoTune, and check the tuning afterwards to make sure it is working correctly and add any fine-tuning necessary. No computer can replace a qualified tuner…. OK, so that’s not entirely true… but you’re relying on more than the computer. You’re relying on your wideband o2 to be perfect. And have you ever seen what happens to a wideband o2 at wide-open-throttle, or anytime really, when it overheats (which is common on an untuned engine that still has too little ignition advance)? The sensor starts reading crazy numbers. You don’t want any computer responding to those wacky numbers by changing the tune of your car and melting your pistons. Do you?
Section Seven: VideosMore to come...
Limited WarrantyWe at DIYAutoTune.com will always stand behind our products. They are thoroughly researched, engineered, and tested; and properly installed and tuned should provide you with many years of use. Your MegaSquirtPNP product is covered under this warranty for defects in workmanship or materials for 1 year from the date of purchase. When Warranty is made voidObviously this warranty cannot cover units that have been modified by the end user to extend functionality. Nor can it cover units where repairs have been attempted or made outside of DIYAutoTune.com or it’s authorized repair facilities. Alternately you may void this warranty by failing to read and follow the documentation contained within this manual completely. Warranty RepairsContact DIYAutoTune.com technical support at websales@diyautotune.com if you believe you have a product defect during the warranty period. Products returned for service must be securely packed to prevent damage, and shipped charges prepaid. Include proof of purchase and the RMA number supplied by the representative authorizing the return. DIYAutoTune.com will within a reasonable amount of time from receipt of your package so shipped return your repaired product to you, or at our discretion return a new or reconditioned replacement of equal or greater functionality to the product in it’s original shipping form. All products shall remain under warranty for the remainder of their original warranty period. DisclaimerDIYAUTOTUNE.COM AND PARENT COMPANY HOFFMANN INNOVATIONS, INC. MAKES NO OTHER EXPRESS OR IMPLIED WARRANTY WITH RESPECT TO YOUR DIYAUTOTUNE.COM PRODUCT OTHER THAN THE LIMITED WARRANTY SET FORTH ABOVE. No DIYAutoTune.com dealer, agent, or employee is authorized to make any modification, extension, or addition to this warranty, unless enforceable or unlawful under applicable law, DIYAUTOTUNE.COM AND PARENT COMPANY HOFFMANN INNOVATIONS, INC. DISCLAIMS ALL IMPLIED WARRANTIES, INCLUDING THE IMPLIED WARRANTIES OF MERCHANTABILITY, NONINFRINGEMENT, AND FITNESS FOR A PARTICULAR PURPOSE, AND THE LIABILITY OF DIYAUTOTUNE.COM AND PARENT COMPANY HOFFMANN INNOVATIONS, INC., IF ANY, FOR DAMAGES RELATING TO ANY ALLEGEDLY DEFECTIVE PRODUCT SHALL UNDER ANY TORT, CONTRACT, OR OTHER LEGAL THEORY BE LIMITED TO THE ACTUAL PRICE PAID FOR SUCH PRODUCT AND SHALL IN NO EVENT INCLUDE INCIDENTAL, CONSEQUENTIAL, SPECIAL, OR INDIRECT DAMAGES OF ANY KIND EVEN IF DIYAUTOTUNE.COM AND PARENT COMPANY HOFFMANN INNOVATIONS, INC. IS AWARE OF THE POSSIBILITY OF SUCH DAMAGES. Some states do not allow limitations on how long an implied warranty lasts or the exclusion or limitation of incidental or consequential damages, so the above limitations or exclusions may not apply to you.
|
||||||||||||||||||||||||||||||||||||||
Home Pictures Features Installation Downloads Dyno Results What's Next?
![]()
The MegaSquirtPNP™, as with any programmable engine management system, may not
be legal for use on pollution controlled vehicles and is therefore produced and sold for off road/race use only. Check federal/local laws.
MegaSquirtPNP™, MSPNP™, MegaSquirt PNP™, and MS PNP™, are trademarks of Hoffmann Innovations, Inc d/b/a DIYAutoTune.com.